目前有組一台主機來做科學計算,因此打算建構一個 remote 環境運行 Jupyterhub 跑科學計算。 原則上使用 jupyterhub 只是假設未來有多人使用需求可以區隔環境。
架構大概是這樣:
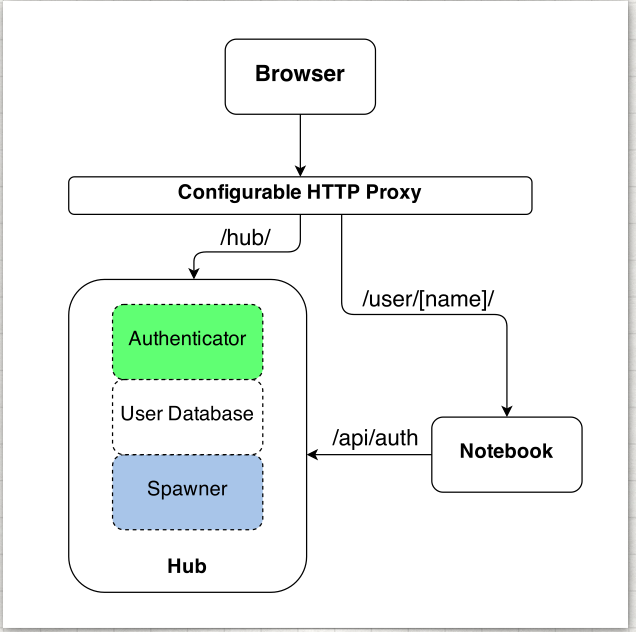
透過 jupyterhub 來設定多人可登入主機。官方教學會有幾個重點:
# wget anaconda and install
$ wget https://repo.continuum.io/archive/Anaconda3-5.1.0-Linux-x86_64.sh
$ bash Anaconda2-4.0.0-Linux-x86_64.sh
安裝 node.js 與套件管理工具 npm
$ sudo apt-get install npm nodejs-legacy
接著安裝 proxy
$ npm install -g configurable-http-proxy
因為一開始就用 anaconda 安裝 Python,anaconda 管理套件方式是採用 conda 因此直接用 conda 安裝 jupyterhub 和 notebook (參考)
$ conda install -c conda-forge jupyterhub
$ conda install notebook
安裝完成之後測試看看是否 hub 和 proxy 都有安裝成功,執行下面兩個指令如果有跑處 help 畫面就算是成功
$ jupyterhub -h
$ configurable-http-proxy -h
建議在 /etc/ 底下,建立一個 jupyterhub 資料夾
sudo mkdir -p /etc/jupyterhub
測試在這個資料夾底下執行 jupyterhub,但因為這是沒有 ssl 所以是採 http,http://your_ip_address:8000
$ jupyterhub --no-ssl
在路徑 /etc/jupyterhub 底下產生
openssl req -x509 -nodes -days 365 -newkey rsa:1024 -keyout mykey.key -out mycert.pem
產生 ssl 認證 key 之後接著就可以用 https 登入 hub
$ jupyterhub
接著可以建立 hub 的 config file
#Create Jupyterhub configuration file
$ jupyterhub --generate-config
接著下面會說明認證方式,接著再回來說明 config file: jupyterhub_config.py 如何設定
比較複雜,使用 PAM 所以會綁定系統的帳戶。參考
流程大略是安裝一個 sudospwawner 接著建立一個帳號來做啟動 jupyterhub 這樣就可以不需要 root 權限並做認證。
# create user run hub
$ sudo useradd rhea

# Spawner to enable monitoring the single-user servers with sudo:
$ sudo pip install sudospawner
編輯 /etc/sudoers 或是 (use visudo for safe editing of sudoers):
# comma-separated whitelist of users that can spawn single-user servers
# this should include all of your Hub users
Runas_Alias JUPYTER_USERS = rhea, zoe, wash

# the command(s) the Hub can run on behalf of the above users without needing a password
# the exact path may differ, depending on how sudospawner was installed
Cmnd_Alias JUPYTER_CMD = /usr/local/bin/sudospawner

# actually give the Hub user permission to run the above command on behalf
# of the above users without prompting for a password
rhea ALL=(JUPYTER_USERS) NOPASSWD:JUPYTER_CMD
接著啟用 PAW 不須要 root 權限,首先先確認權限狀態
$ ls -l /etc/shadow
-rw-r-----  1 root shadow   2197 Jul 21 13:41 shadow
$ ls -l /etc/shadow
-rw-------  1 root wheel   2197 Jul 21 13:41 shadow
接著建立 shadow 群組並且修改檔案權限
$ sudo groupadd shadow
$ sudo chgrp shadow /etc/shadow
$ sudo chmod g+r /etc/shadow
將 rhea 增加為 shadow 群組
$ sudo usermod -a -G shadow rhea
設定 port 80 可以運行 jupyterhub,如果有錯誤可以查看這篇參考
$ sudo setcap 'cap_net_bind_service=+ep' /usr/bin/node
or
$ sudo setcap 'cap_net_bind_service=+ep' `which node`
最後要設定 jupyterhub_config.py。也可以參考官網
import os
file_path = os.path.dirname(os.path.abspath(__file__))

# db
c.JupyterHub.db_url = os.path.join(file_path, 'jupyterhub.sqlite')


# Jupyterhub setting

c.Spawner.default_url = '/lab' # should be install jupyter labextension
c.Spawner.cmd = ['jupyter-labhub']
c.Spawner.notebook_dir = '~/notebooks'


## Jupyterhub service setting by Jason

c.JupyterHub.spawner_class = 'sudospawner.SudoSpawner'
c.JupyterHub.ssl_cert = os.path.join(file_path, 'mycert.pem')
c.JupyterHub.ssl_key = os.path.join(file_path, 'mykey.key')
c.JupyterHub.cookie_secret_file = os.path.join(file_path, 'jupyterhub_cookie_secret')
c.JupyterHub.proxy_cmd = ['/usr/local/bin/configurable-http-proxy']


# This is an application.
# create system users that don't exist yet
c.LocalAuthenticator.create_system_users = True
c.Authenticator.whitelist = {'{username}'}
c.Authenticator.admin_users = {'{username}'}
用來讓畫面比較好看
$ jupyter labextension install @jupyterlab/hub-extension
畫圖用,裝了 jupyterlab 一定要裝這個套件才能正常運作
$ jupyter labextension install jupyterlab_bokeh
可以選擇 R 來運作
$ conda update anaconda
$ conda install -c r r-essentials
如果要使用 jupyterhub 來進行帳號認證流程如下: + 透過 sudo 建立一個帳號 + 帳號設定為 jupyterhub 群組 + 新增的帳號家目錄底下新建一個 /notebooks 的資聊夾用來存放分析程式 + 編輯 /etc/sudoer 將使用者加入
操作流程
# 新增帳號, useradd (不會建立家目錄) adduser (會建立家目錄)
$ sudo adduser jupyter

# 將帳號設定為 jupyterhub 群組
$ sudo usermod -a -G jupyterhub jupyter

# 新帳號底下建立 notebooks 資料夾
$ sudo su jupyter
$ mkdir -p ~/.notebooks

# 編輯 /etc/sudoer 將使用sudo vim /etc/sudoers者加入可以登入權限
$ sudo vim /etc/sudoers
Runas_Alias JUPYTER_USERS = jupyter
sudo -u rhea jupyterhub -f /etc/jupyterhub/jupyterhub_config.py
使用帳號登入 localhost:8000 並且啟動 server
參考文獻